Unlock Your Bar’s Full Potential
Imagine a fitness bar perfectly tailored to your evolving routine—holding resistance bands, suspension trainers, gymnastics rings, or accessories exactly where you need them for every workout. This isn’t a luxury reserved for commercial gyms; it’s the hallmark of a serious home training environment. That level of seamless customization starts with one fundamental skill: securely adding hooks and straps. Mastering the safe installation of additional hardware is the key to transforming a simple bar from a single-purpose tool into a versatile, professional-grade anchor point for your entire fitness ecosystem.
Foundational Choices – Hardware and Planning
Your success and safety hinge on the decisions you make before you touch a tool. This phase is about matching the right hardware to your specific bar and goals.
Assessing Your Bar: The Critical First Step
Begin by conducting a thorough inspection. Identify your bar’s type (wall-mounted rack, ceiling-mounted rig, doorway pull-up bar, freestanding power tower), its material (powder-coated steel, chrome-plated, stainless), and its precise diameter. Locate any existing weld seams, as you should avoid drilling near them. Most critically, understand the bar’s stated weight load limit—any additions you make must operate well within this capacity, accounting for dynamic forces.
Selecting the Right Hardware for the Job
Choose hardware based on your intended use and desired permanence.
- Hook Options: S-hooks (quick, removable); J-hooks (secure, for hanging); Climbing-rated carabiners (versatile, locking); Specialized fitness hooks (often padded).
- Strap Options: Nylon webbing straps (for looping); Closed loop straps (for carabiner attachment); Adjustable suspension straps (for TRX-style training).
- Attachment Methods: Your primary decision path: Clamping/Wrapping (non-permanent) vs. Drilling (permanent).
The Essential Tools & Safety Gear
Gather your toolkit: measuring tape, marker, adjustable wrench or socket set, screwdriver, drill with metal bits (if going permanent), and a file or sandpaper. The non-negotiable safety step is verifying your bar’s primary mount is 100% secure before adding any secondary hardware. Test its stability with your body weight first.
The Core Installation System – Method and Execution
With your hardware selected, you now execute one of two proven systems. Choose based on your bar type and long-term intentions.
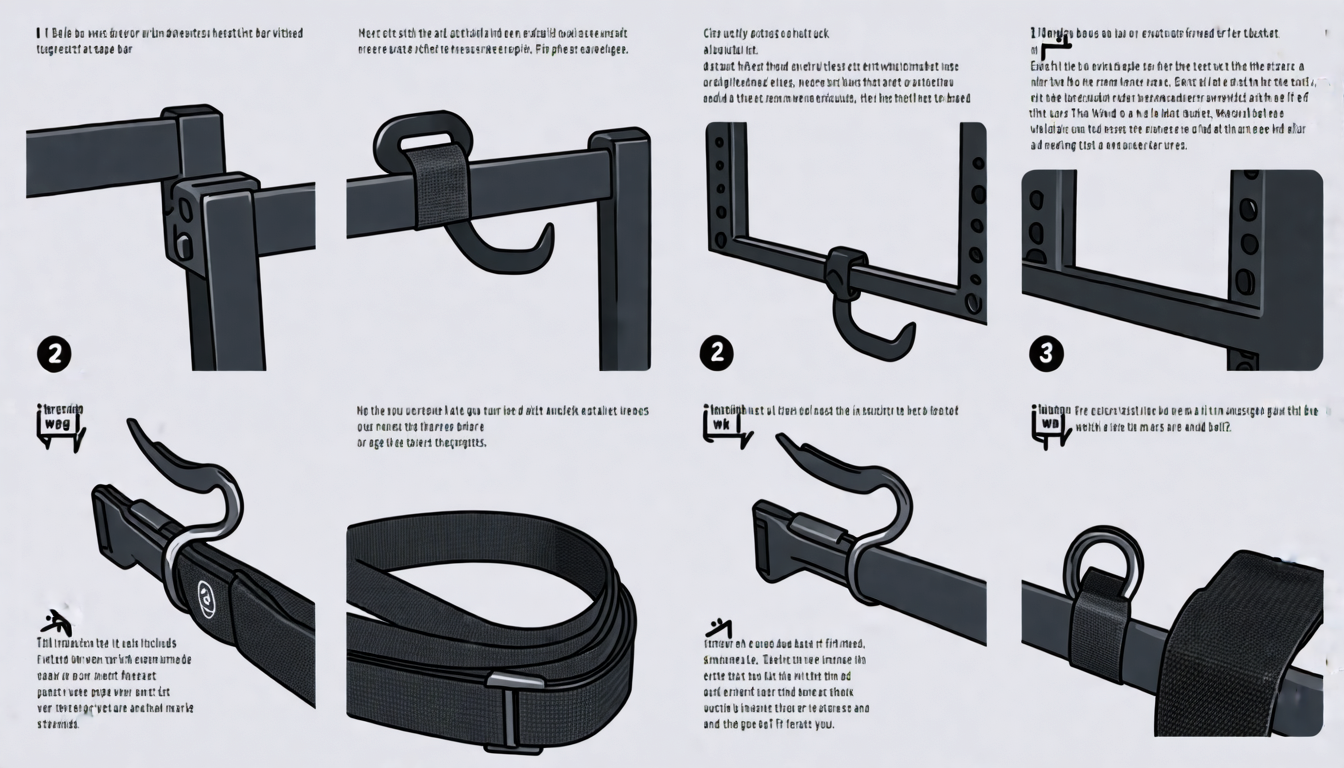
The No-Drill Method: Clamps and Wraps
This is the ideal, reversible approach for most users. It preserves your bar’s finish and warranty.
- For Hooks (Using Clamps): Select heavy-duty, adjustable pipe clamps or specialty bar clamps. Position the clamp on the bar where you want the hook. Insert the hook’s attachment ring into the clamp’s bolt before tightening. Use a wrench to tighten the clamp securely until it cannot rotate under hand pressure.
- For Straps (Using Wraps): Pass the strap around the bar. For a secure anchor point, use a carabiner through the strap’s loop or employ a girth hitch. The key is to ensure the working end of the strap is tight against the bar and that the load pulls in a direction that tightens the wrap, not loosens it.
The Permanent Method: Drilling and Mounting
Warning: Drilling should be a last resort. It can void warranties, compromise structural integrity if done poorly, and create rust points. Only consider this on thick, solid steel bars where clamps are ineffective.
- Mark & Pilot: Precisely mark your drill points. Start with a small center punch to create a dimple that prevents the drill bit from wandering.
- Drill: Using a sharp metal drill bit, start with a small pilot hole, then step up to your final size (e.g., for a 1/4″ bolt, drill a 1/4″ hole). Use steady pressure and lubricant (like cutting oil) to keep the bit cool.
- Finish & Secure: Deburr the hole’s edges with a file or sandpaper to remove sharp metal fragments. Immediately apply a touch of clear nail polish or anti-rust paint to the bare metal. Secure your hook or mounting plate using a bolt, washer, and locknut—avoid screws which can strip out under load.
| Method | Best For | Key Tools | Critical Check |
|---|---|---|---|
| No-Drill (Clamp/Wrap) | Temporary setups, renters, thick bars, preserving finish. | Adjustable clamps, straps, wrench. | Weekly check for clamp slippage or strap wear. |
| Permanent (Drill) | Permanent multi-use stations, thin bars where clamps fail. | Center punch, drill, metal bits, file, bolt/locknut. | Deburr and protect holes from rust; ensure bolt is flush. |
Advanced Practices – Optimization and Use
Installation is just the beginning. Proper placement and validation turn your work into a reliable training asset.
Strategic Placement for Maximum Utility
Plan your hook/strap locations around your exercises. For band pulls, place hooks at bar ends. For knee raises or ring training, central positions are key. Always consider balance—avoid clustering heavy loads on one section of a long bar, which can create uneven stress. Distribute attachment points symmetrically when possible.
Securing and Testing Your Installation
Never assume it’s ready. Follow this pre-use checklist:
- Tightness: Can the clamp or bolt be tightened further with a tool?
- Alignment: Is the hardware oriented correctly for the load direction?
- Clearance: Does anything interfere with your range of motion?
Then, conduct a stress test. Hang from the new attachment briefly with your body weight. Next, add slow, controlled dynamic movement. Finally, test it with the intended load (e.g., bands, weight plates) at a sub-maximal level. Listen for creaks and watch for any movement or deformation.
Threat Management – Problem Prevention and Solutions
A proactive mindset is your best defense against failure and injury.
Prevention: Ensuring Long-Term Safety
Incorporate hardware inspection into your weekly gym maintenance. Look for:
- Wear: Fraying on straps, deep scratches on bars under clamps.
- Loosening: Clamps that have rotated or bolts that feel less tight.
- Corrosion: Rust on hardware or in drilled holes.
Protect your bar and floors by using hardware with rubberized coatings or adding your own protective vinyl tape where clamps contact the bar.
Intervention: Troubleshooting Common Issues
| Problem | Likely Cause | Immediate Solution |
|---|---|---|
| Slipping straps or spinning clamps | Insufficient friction or torque. | Apply a layer of rubberized friction tape to the bar first. For clamps, use a lockwasher or a second locknut. |
| Hardware digs into or scratches bar finish | Metal-on-metal contact or overtightening. | Install a protective nylon or rubber sleeve on the bar before clamping. Ensure hardware is clean and free of grit. |
| Creaking noises under load | Micro-movement between parts. | Disassemble, clean contact points, and re-tighten. A small amount of dry lubricant on threads can help. |
Your Installation Action Plan
This roadmap guides your project from start to finish:
| Phase | Primary Tasks | Focus On |
|---|---|---|
| Assessment & Planning | Identify bar type/diameter, check load limit, choose hardware method. | Safety and compatibility. Never exceed manufacturer limits. |
| Installation | Gather tools, execute chosen method (clamp/wrap or drill), secure firmly. | Precision and security. Double-check every fastener. |
| Validation & Integration | Perform stress test, check clearance, integrate into your workout. | Function and safety under dynamic load. Start light. |
| Maintenance | Weekly visual inspections, monthly torque checks, clean as needed. | Preventive care. Catch wear before it becomes failure. |
From Standard Bar to Custom Power Hub
Mastering the art of adding hooks and straps is what separates a static piece of equipment from a dynamic training partner. It begins with the respectful assessment of your bar’s limits, moves through the deliberate choice and execution of a secure installation method, and culminates in the confident, tested use of your newly expanded setup. This knowledge transforms your space. That simple bar becomes the anchor for resistance bands that fuel your strength, the stable point for suspension trainers that challenge your core, and the reliable hub for all the tools that drive your progress. The result is more than convenience; it’s a perfectly personalized training environment that evolves with your ambitions, offering unparalleled versatility and rewarding mastery every time you step up to train.


