Introductory Dip Exercises: The Gateway to Unshakeable Strength
The Vision: From Zero to Hero
Imagine the moment of pure, physical command: hoisting your entire body weight with ease, feeling the solid engagement of a powerful chest, resilient shoulders, and robust arms. This isn’t just about aesthetics; it’s the foundation of functional, unshakeable strength that translates to real-world power. The journey to this pinnacle doesn’t begin with weighted belts or gymnastic rings. It starts by mastering the most fundamental pushing pattern for your upper body. Introductory dip exercises are the non-negotiable bedrock, the essential key to unlocking safe, sustainable, and superior strength. They are not a simplified version of the “real” exercise; they are the intelligent, systematic process of building the movement from the ground up.
Foundational Choices: Your Body’s “Hardware” Setup
Your success in building dip mastery is dictated by your initial setup—the equipment you choose and the posture you adopt. This foundation determines your safety, efficiency, and long-term progression potential.
Part A: Equipment Selection
Choosing the right tool is your first critical decision. Not all bars are created equal for the beginner.
- Parallel Bars (Stationary): The gold standard. Ideal for learning true body alignment. Seek bars with a width slightly wider than your shoulders (a common starting point is 18-24 inches apart). Ensure they are stable and have textured grips.
- Assisted Dip Machine: An excellent tool for practicing the full movement pattern under reduced load. Focus on maintaining perfect form, not just moving the stack.
- Sturdy Furniture (Countertops, Chairs): A viable home option for bench dips. Non-negotiable requirement: The surfaces must be absolutely immovable and level. Place chairs against a wall for stability.
Part B: Body Positioning & Alignment
Before you move a single inch, you must set your body’s architecture. This is the software that runs on your hardware.
- The “Hollow Body” Setup: On the bars, lock out your arms. Squeeze your glutes and brace your core to prevent your ribs from flaring and your lower back from arching. Your body should form a straight, tense line from shoulders to ankles.
- The Scapular Rhythm: The very first movement of a dip is not bending your elbows. It is a deliberate depression and retraction of your shoulder blades—pull them down and back. This activates the latissimus dorsi and creates a stable shelf for the entire movement.
Part C: The Strength Prerequisites Table
Before loading your body on the bars, you must pass the basic strength audit. This table assesses your readiness for introductory dip exercises.
| Component Category | Key Characteristics & Minimum Standard |
|---|---|
| Push-Ups | A minimum of 15 clean, full-range reps. This demonstrates essential chest, shoulder, and triceps endurance and stability in a horizontal push pattern. |
| Parallel Bar Support Hold | The ability to hold the top position (arms locked, hollow body) for 30+ seconds. This proves you can control your shoulder stability under load without movement. |
| Overhead Press (Light Dumbbell) | Control of a weight overhead for 10+ reps. Indicates healthy shoulder mobility and stability in the overhead position, which translates to the bottom of the dip. |
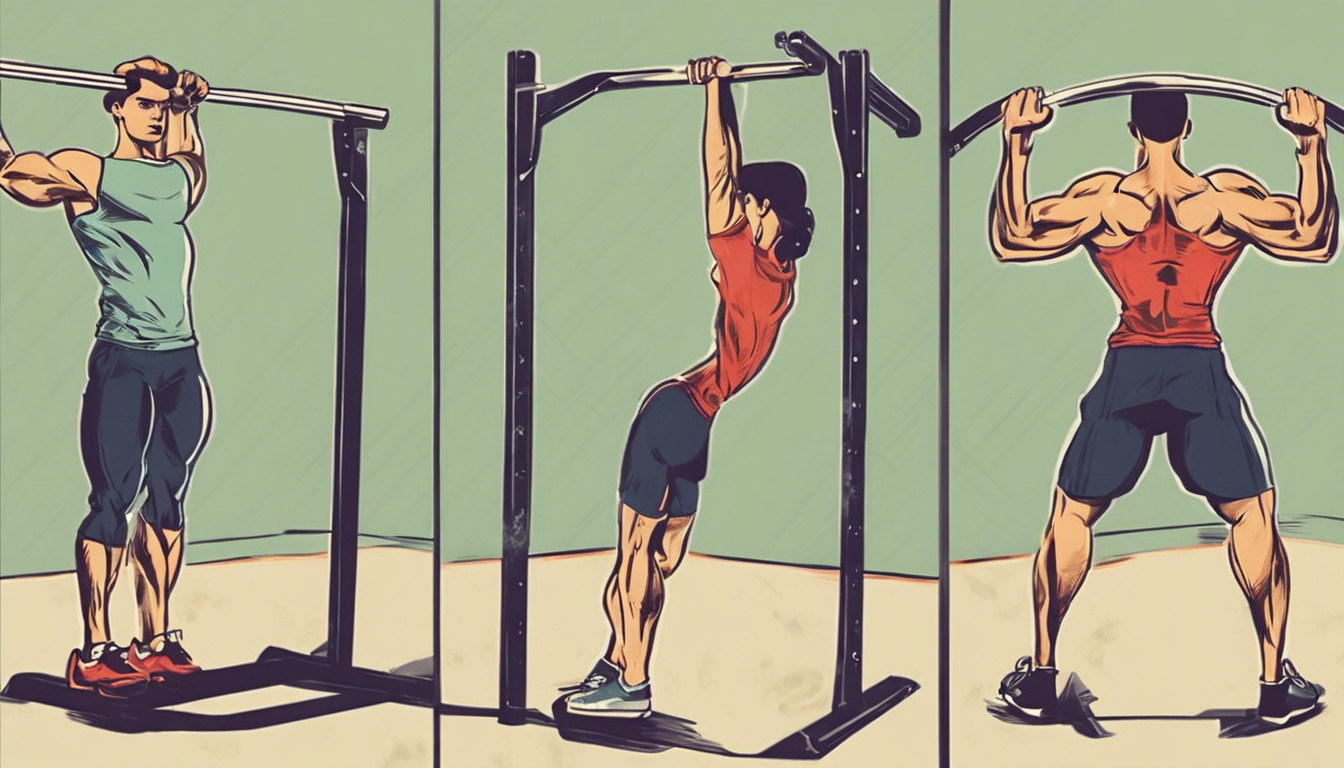
The Core System: Mastering the Movement Pattern
The dip is not merely an up-and-down motion. It is a precise system of joint control and full-body tension management. Master each phase independently to own the whole.
Control Variable 1: The Descent (Eccentric Phase)
This is where strength is built and injuries are prevented.
- Ideal Execution: A controlled, 3-4 second descent. Lower until your shoulders are slightly below your elbows (upper arm roughly parallel to the floor). Maintain the hollow body and depressed scapulae.
- Consequence of Error: Dropping like a stone creates massive shear forces on the shoulder and elbow joints, inviting tendinitis and ligament strain.
- Control Methods: Practice eccentric-only dips. Use a box or step to get to the top, then lower yourself with perfect control for 5 seconds. Repeat.
Control Variable 2: The Bottom Position
This is the make-or-break point for shoulder health.
- Ideal Target: A brief, tension-filled pause. Shoulders are actively depressed, chest is slightly forward, elbows are tucked at about a 45-degree angle to your torso. No pinching in the front of the shoulder.
- Consequence of Error: A “floppy” bottom—where shoulders hike up to your ears—places the entire load on the passive structures of the anterior shoulder capsule.
- Control Methods: Use box-assisted partial reps. Set a box high enough that you touch it lightly at your target depth, reinforcing the correct position. Practice isometric holds here for 5-10 seconds.
Control Variable 3: The Ascent (Concentric Phase)
This is the expression of the power you’ve stored.
- Ideal Execution: Initiate by driving through your palms, not just straightening your arms. Think of “pushing the bars down” or “pushing the floor away.” Maintain torso tension to prevent swinging.
- Consequence of Error: Elbows flaring out to the sides turns the movement into an unstable, shoulder-dominant press. Hips sagging breaks the kinetic chain.
- Control Methods: Use a resistance band for assistance. Loop it around the bars and under your knees or feet. This provides the most help at the hardest point (the bottom) and trains the correct bar path. Focus on squeezing the bars hard.
Advanced Introductory Practices: Building True Proficiency
Moving from simply performing a rep to owning the movement requires a strategic approach to preparation, progression, and programming.
Preparation: Prehab and Mobility
Your daily practice off the bars ensures longevity on them.
- Wrists: Spend 2 minutes daily on wrist flexion/extension stretches and rotations.
- Scapulae & Shoulders: Perform scapular wall slides (2×15) and dead hangs from a pull-up bar (3×30 seconds) to build active mobility and decompress the joints.
Ongoing Progression: The Four-Stage Pathway
Follow this clear, sequential roadmap. Do not advance until you can perform 3 sets of 8-10 clean reps with the current progression.
- Bench Dips: Feet on floor, hands on bench behind you. Master the elbow path and range of motion.
- Foot-Assisted Parallel Bar Dips: Feet on the floor or a box in front of you, providing direct assistance. Focus on the full top-to-bottom rhythm.
- Band-Assisted Dips: Using a looped resistance band for dynamic assistance. This is the final step before full bodyweight.
- Full Range of Motion Dips: The unassisted, controlled movement you’ve built towards.
Selection and Strategy: Integrating into Your Routine
Introductory dip exercises are a primary strength movement.
- Frequency: 2-3 times per week, with at least one day of rest between sessions.
- Placement: Perform them early in your workout, after your warm-up, when you are freshest.
- Volume: Start with 3 sets of 5-8 reps (stopping 1-2 reps short of failure). Focus on quality. Add one rep per set each week as your strength grows.
Threat Management: Injury Prevention and Solution
A proactive mindset is your best defense against setbacks. Pain is not a rite of passage; it is a stop sign.
Prevention: The Proactive Protocol
- Never skip your dynamic warm-up (arm circles, cat-cow, light band pull-aparts).
- Adhere strictly to the progression model; ego-lifting has no place here.
- If you feel a sharp pinch, a deep ache, or joint pain (as opposed to muscular fatigue), stop the set immediately.
Intervention: Common Issues & Fixes
| Issue | Likely Cause | Tiered Response Plan |
|---|---|---|
| Anterior Shoulder Pain | Excessive forward lean, elbows flaring, descending too deep without control. | 1. Form Check: Re-establish hollow body & scapular depression. 2. Reduce ROM: Only dip to 90 degrees. 3. Regress: Return to band-assisted or foot-assisted dips. 4. Professional: If pain persists for 48+ hours, consult a physiotherapist. |
| Wrist Discomfort | Poor wrist alignment (bent excessively), lack of mobility. | 1. Form Check: Grip the bar firmly in the base of your palm, keep wrists neutral. 2. Tool Change: Use parallettes or dip bars with angled grips if available. 3. Prehab Focus: Double down on daily wrist mobility work. |
| Chest Strain (Pec Soreness) | Overzealous volume, insufficient warm-up, bouncing at the bottom. | 1. Deload: Reduce volume by 50% for a week. 2. Tempo Focus: Emphasize a 3-second pause at the bottom, eliminating momentum. 3. Recovery: Apply heat, ensure adequate protein intake for repair. |
The Action Plan: Your 8-Week Introductory Calendar
This phased roadmap systematically builds the competency and strength for your first full dip. Adhere to the focus of each phase.
| Phase | Primary Tasks | Focus On |
|---|---|---|
| Weeks 1-2: Foundation | Master Prerequisites (30-sec support hold, 15+ push-ups). Practice Bench Dips 3×10. Daily mobility drills. | Building confidence in the support position and the basic dipping pattern. Neuromuscular connection. |
| Weeks 3-4: Pattern Acquisition | Begin Foot-Assisted Parallel Bar Dips 3×8. Incorporate 3-second Eccentric-Only dips 2×5. Maintain support holds. | Developing control in the full vertical path. Reinforcing the slow, strong descent. |
| Weeks 5-6: Strength Building | Progress to Band-Assisted Dips 3×8. Introduce isometric holds at the bottom for 5 seconds. Reduce foot assistance. | Overcoming the “sticking point” at the bottom. Building concentric strength from a dead stop. |
| Weeks 7-8: Mastery & Integration | Perform 1-3 Full Bodyweight Dips per set (alternating with band-assisted reps to complete 3×8 total). Solidify as a staple in your push workouts. | Achieving full ROM under full bodyweight. Transitioning from a learning drill to a core strength exercise. |
The Transformation: The Strength You Own
The journey of introductory dip exercises reinforces the core principle that all physical mastery is built on the disciplined, patient practice of fundamentals. You have moved from assessing your prerequisites, to selecting your tools, to deconstructing and controlling each phase of the movement, to following a proven progression. The result is not merely your first full dip. It is the profound, embodied confidence that comes from building true, resilient strength from the ground up. This foundational capability enriches your physical potential, serving as a springboard for advanced calisthenics, greater pressing power, and a lifetime of resilient shoulder health. You didn’t just learn an exercise; you installed a pillar of unshakeable strength.