The Vision of a Complete Home Gym
Imagine transforming a corner of your home into a dynamic combat fitness zone. The satisfying burn of a final pull-up transitions seamlessly into the rhythmic thud of precise combinations. Stress evaporates with every strike, while functional strength and explosive cardio are forged in one seamless, powerful session. This isn’t a fantasy reserved for commercial gyms; it’s the pinnacle of intelligent home training. The versatile fitness bar is the centerpiece of this vision, yet its potential is often shackled to pull-ups and knee raises. For the home athlete seeking more, one critical question defines the ceiling of their progress: can I attach a punching bag to a fitness bar?
This question is the gateway. Mastering this integration safely and effectively is the key to unlocking a superior, full-spectrum fitness system. It transforms a simple strength tool into the heart of a regimen that builds raw power, anaerobic endurance, and technical striking skill—all under one bar.
Foundational Choices: Hardware and Compatibility
Your success and safety are engineered in the initial choices. This is a matter of physics, not opinion. Assuming your setup can handle the dynamic, punishing forces of a punching bag is the fastest route to equipment failure or injury.
Part A: Assessing Your Fitness Bar’s Capabilities
Not all bars are created equal. Your first step is a ruthless audit of your equipment’s specifications.
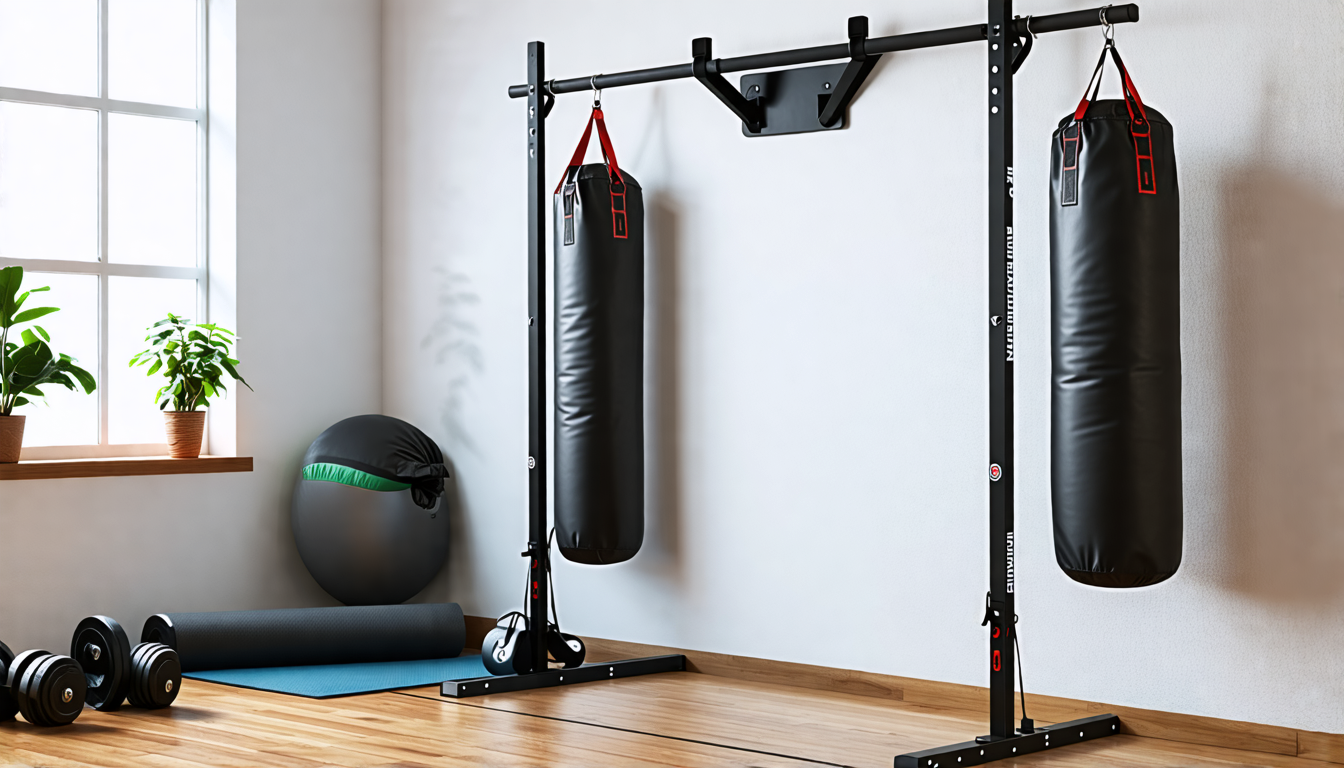
- Stationary Wall-Mounted Bars: The best candidates, provided they are bolted into wall studs with long, high-grade lag bolts. Their fixed nature offers the most stable platform.
- Doorway Pull-Up Bars: Proceed with extreme caution. Most rely on pressure and friction. The torsional force from a swinging bag can easily dislodge them. They are rarely designed for dynamic lateral loads.
- Power Towers or Squat Rack Cages: Often excellent candidates due to their freestanding, heavy-duty construction. Ensure the top bar is designed for dynamic movement and check the manufacturer’s load rating.
The Golden Rule: The bar’s rated dynamic load capacity must significantly exceed the combined weight of the bag plus the force of your strikes. If the bar is rated for 300 lbs of bodyweight, that rating is for controlled, vertical movement—not the violent, shifting forces of a strike. For a 70lb bag, your bar should have a minimum dynamic rating of 200-250 lbs as a starting point.
Part B: Punching Bag Selection and Sizing
Choosing the right bag is a strategic compromise between training utility and structural safety.
- Free-Standing Bags (e.g., Maize Bags, Reflex Bags): Often the safest and most practical choice. They can be placed adjacent to your bar for circuit training without imposing any load on it.
- Light Hanging Bags (40-70 lbs): The upper limit for most home bars. Ideal for speed, technique, and combination work. A 70lb bag will swing aggressively, testing your setup.
- Heavy Bags (100 lbs+): Typically a poor choice for bar mounting. The mass creates immense torque and swing, placing unsustainable stress on welds, bolts, and wall anchors.
Part C: Mounting Hardware Breakdown
The hardware is your critical safety link. Never use unrated hardware from a general hardware store.
| Component Category | Options | Key Characteristics |
|---|---|---|
| Primary Mounting Hardware | Heavy-Duty S-Hooks, Forged Steel Carabiners, Swivel Mounts, Specialized Bar Adapters |
|
| Support & Stabilization | Additional Wall Braces, Freestanding Base Weights, Torque Arms |
|
The Core System: Safe Installation and Force Management
Hanging the bag is just the beginning. You are now the engineer of a dynamic force system. Your goal is to manage energy, directing it into the bag’s movement, not the structure’s destruction.
Variable 1: Installation Force Distribution
Ideal Target: A purely vertical load on the bar’s center, with all hardware aligned to minimize lateral pull.
Consequences of Error: Shear force on bolts, progressive loosening of anchors, catastrophic collapse.
Control Method:
- Use a redundant safety strap—a second, shorter chain or strap from the bag loop to the bar as a backup.
- Ensure the bag hangs perfectly centered. An off-center bag creates a constant uneven load.
- For doorway bars, a cross-beam adapter that spans the trim and distributes load is the minimum viable solution.
Variable 2: Training Force and Impact Control
Ideal Target: Strikes that absorb into the bag’s mass, causing it to swing while the bar assembly remains quiet and stable.
Consequences of Error: Violent shaking transmits shock waves through the structure, creating noise, disturbing housemates, and accelerating metal fatigue.
Control Method:
- Prioritize technical volume over raw power. Focus on 3-5 punch combinations, speed drills, and footwork.
- Practice “striking control” – hitting with enough force to snap the bag back, not to make the ceiling shake.
- If using kicks, use push kicks or light round kicks to the base; avoid full-power thrust kicks.
Advanced Practices: The Integrated Workout
With a secure, silent system, the true art begins. This is where you cultivate the hybrid athlete, blending strength with explosive movement.
Preparation: The Hybrid Circuit Setup
Arrange your space for seamless flow. The bag should be within one step of the bar. This eliminates downtime and turns transition into part of the workout, keeping your heart rate elevated.
Ongoing Inputs: Programming for Power
This is where the system pays dividends. Sample Hybrid Circuit (Repeat 4-5 rounds):
- Max Strict Pull-Ups (Bar) – Build raw strength.
- 45-Second Speed Combinations (Bag) – Jab-cross-hook, focus on snap and return.
- 15-20 Hanging Knee Raises (Bar) – Engage the core.
- 45-Second Defensive Shell & Footwork (Around Bag) – Practice slips, weaves, and angles.
- 30-Second Rest.
Selection and Strategy: Bag Drills for the Home Athlete
Without a coach holding pads, the bag becomes your primary partner. Drills should emphasize:
- Accuracy: Mark small targets with chalk.
- Combination Flow: Drill 5-6 punch sequences until they are automatic.
- Pace & Endurance: Use a timer for 3-minute “rounds” of constant, varied output.
Threat Management: Problem Prevention and Solution
A proactive mindset is your best defense. Your equipment inspection is as vital as your warm-up.
Prevention: The Daily/Weekly Inspection Ritual
Before every session, conduct a 60-second check:
- Visual Check: Look for new cracks in drywall, warping or bending in the bar.
- Hardware Check: Feel for any looseness in bolts, S-hooks, or chains.
- Function Test: Give the bag a light push. Listen for unusual creaks or rattles.
Intervention: Identifying and Solving Common Problems
Problem: Bar Sway or “Shimmy” on Impact.
Tier 1 Solution: Tighten all mounting hardware. Reduce your striking force and focus on technique.
Tier 2 Solution: Install diagonal wall braces or, for freestanding units, add significant weight to the base. Consider a heavier, more stable bar.
Problem: Loud Banging or Metal-on-Metal Clanging.
Solution: Isolate the noise. Wrap chains or S-hooks in high-density foam and secure with duct tape. Ensure the swivel is lubricated. Consider a bag with a softer, synthetic leather shell.
Your Installation and Training Calendar
| Phase | Primary Tasks | What to Focus On |
|---|---|---|
| Assessment & Planning | Locate your bar’s manual and verify its dynamic load rating. Select a bag under 70lbs. Purchase load-rated hardware (swivel, carabiner, safety strap). | Safety specifications and honest appraisal of your equipment’s limits. Do not proceed if specs are unclear or inadequate. |
| Secure Installation | Mount bag with redundant safety. Apply gradual force, testing with light pushes then controlled strikes. Perform the initial inspection checklist. | Stability and silence. The system should feel solid and quiet during light technical work. |
| Integrated Training | Begin with 2-week technique acclimation period. Incorporate bag work into hybrid circuits. Perform weekly hardware torque checks and visual inspections. | Flow, conditioning, and skill development. This phase is about cultivating athleticism, not testing the system’s destruction limits. |
The Transformed Home Gym
The question, “Can I attach a punching bag to a fitness bar?” is more than logistical—it’s aspirational. It represents the desire to build a more capable, resilient, and skilled version of yourself within your own walls. The answer is a qualified “yes,” but one that demands respect for the immutable laws of physics and engineering.
This journey from rigorous hardware assessment to the mastery of a controlled, dynamic hybrid system is the hallmark of a dedicated home athlete. It transforms a simple piece of equipment into the cornerstone of a personal combat fitness arena. The profound satisfaction that follows is not just in the improved physique or stamina, but in the ownership of a space where strength, speed, and skill converge. It turns daily workouts into an unparalleled, enriching practice that forges not just a stronger body, but a more focused and resilient mind.


