Whether you’re a fitness enthusiast, a home workout novice, or someone living in rented accommodation, installing a fitness bar without drilling is a convenient and practical solution for enhancing your exercise regimen. The proliferation of no-drill fitness bars, including tension-mounted and suction-mounted types, has made it easier than ever to enjoy the benefits of bodyweight exercises without the need for invasive installation methods. No-drill fitness bars are designed with simplicity and versatility in mind, making them ideal for any home setting. They offer significant advantages, such as easy installation, the ability to preserve wall integrity, and the convenience of portability.
Incorporating a fitness bar into your home gym routine doesn’t mean you have to compromise on convenience or the aesthetics of your living space. No-drill fitness bars eliminate the need for permanent fixtures, making them perfect for those who move frequently or live in rental apartments. This guide will walk you through the various types of no-drill fitness bars available, and outline the many benefits they offer. Additionally, you’ll find a comprehensive, step-by-step installation process to ensure your new fitness bar is both safe and stable for various environments. By the end of this article, you’ll be well-equipped to enhance your home fitness setup with a reliable and versatile no-drill fitness bar.
Understanding No-Drill Fitness Bars: Types and Benefits
When it comes to home fitness solutions, no-drill fitness bars have emerged as a convenient and practical option for many exercise enthusiasts. But what exactly are these no-drill fitness bars, and what types are available on the market? Let’s delve deeper into the various types and the advantages they offer.
First and foremost, no-drill fitness bars are designed to be installed without the need for screws, bolts, or any form of drilling. This feature makes them an attractive choice for individuals who want to avoid damaging their walls or who may be restricted from making alterations to their living space, such as renters. Let’s explore the two primary types of no-drill fitness bars: tension-mounted and suction-mounted.
Tension-Mounted Fitness Bars
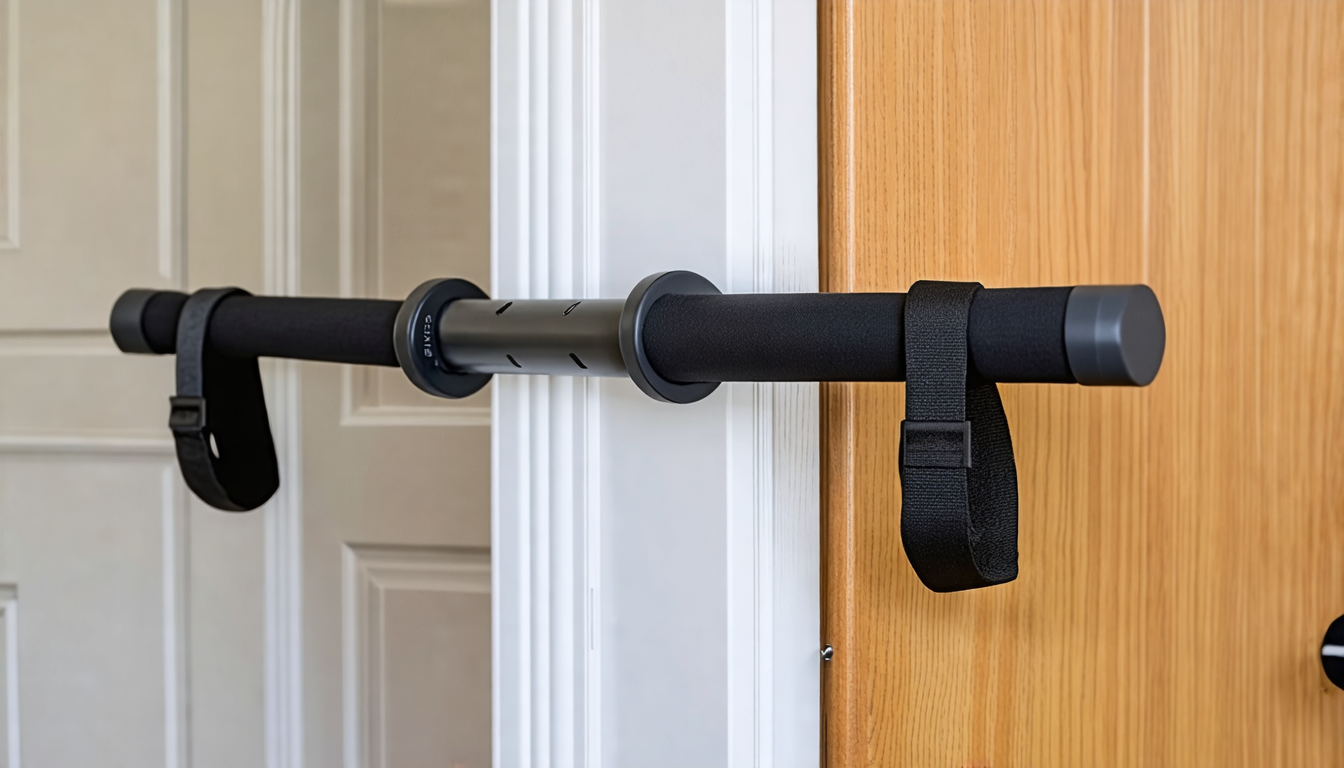
Tension-mounted fitness bars operate by using the principle of tension to stay in place. They are typically installed by twisting the bar to extend it until it fits snugly between two opposing surfaces, such as the sides of a doorway or between two walls. The pressure created by this extension holds the bar securely in place. Tension-mounted bars are available in adjustable lengths, making them versatile for different spaces and widths.
These bars are often used for pull-ups, chin-ups, and can also serve as anchor points for additional exercise equipment like resistance bands. They are made from durable materials such as steel and often feature padded grips for added comfort during workouts.
Suction-Mounted Fitness Bars
Suction-mounted fitness bars use powerful suction cups to adhere to smooth, non-porous surfaces like tiled walls, glass, or laminate. They are particularly useful in spaces where traditional tension-mounted bars may not be feasible. The suction cups provide a secure hold and can be easily removed and repositioned without leaving any residue or damage.
These bars are less common than their tension-mounted counterparts but offer a unique solution for those seeking flexibility in their workout routines. Like tension-mounted bars, suction-mounted fitness bars are built to handle a range of exercises, providing a robust platform for home fitness enthusiasts.
Advantages of Using a No-Drill Fitness Bar
The benefits of adopting a no-drill fitness bar in your home gym setup are manifold. Here are some of the key advantages:
1. Ease of Installation
The primary appeal of no-drill fitness bars is their ease of installation. Unlike traditional fitness bars that require tools, screws, and often significant time and effort to install, no-drill variants can be set up within minutes. This straightforward installation process makes them accessible to everyone, regardless of their DIY skills.
2. Preservation of Wall Integrity
For those who live in rental properties or simply do not wish to make permanent modifications to their homes, no-drill fitness bars offer a perfect solution. By utilizing tension or suction mechanisms, these bars can be installed and removed without causing any damage or leaving unsightly holes in the walls or door frames. This feature is particularly beneficial for preserving the aesthetics and structural integrity of your home.
3. Portability
No-drill fitness bars are highly portable and can be easily transferred from one location to another. This flexibility is ideal for individuals who travel frequently or those who wish to relocate their fitness setup within their home. The ability to quickly set up and dismantle the bar without any hassle makes it a versatile piece of fitness equipment.
4. Adaptable to Various Spaces
Another significant advantage is the adaptability of no-drill fitness bars to different spaces. Whether you have a compact apartment or a spacious home gym, these bars can be adjusted to fit various widths and installed in a range of locations. This adaptability allows users to create a customized workout environment that suits their specific needs and preferences.
5. Cost-Effective
No-drill fitness bars are generally more affordable than their traditional counterparts, making them a cost-effective option for those looking to build a home gym on a budget. The savings on installation costs, coupled with the durability and longevity of these bars, offer great value for money.
6. Convenience and Versatility
Finally, no-drill fitness bars offer a level of convenience and versatility that is hard to match. They provide a reliable platform for performing a wide array of exercises, from pull-ups and chin-ups to hanging leg raises and more. By incorporating a no-drill fitness bar into your home fitness routine, you can enjoy the benefits of a full-body workout without the need for bulky equipment or complex setups.
In summary, understanding the types and benefits of no-drill fitness bars can help you make an informed decision about incorporating them into your home fitness routine. Whether you opt for a tension-mounted or suction-mounted bar, the ease of installation, preservation of wall integrity, portability, adaptability, cost-effectiveness, and versatility make these fitness bars an excellent addition to any home gym.
### Installation Process for No-Drill Fitness Bars
When it comes to enhancing your home fitness setup without causing any damage to your property, no-drill fitness bars are an excellent solution. They provide the same functionality and support as traditional fitness bars, without the need for permanent alterations. Here’s a step-by-step guide to properly install different types of no-drill fitness bars and tips to ensure their safety and stability in various environments like rental apartments and home gyms.
#### Tension-Mounted Fitness Bars
Tension-mounted fitness bars use mechanical tension to stay in place. Follow these steps for a secure installation:
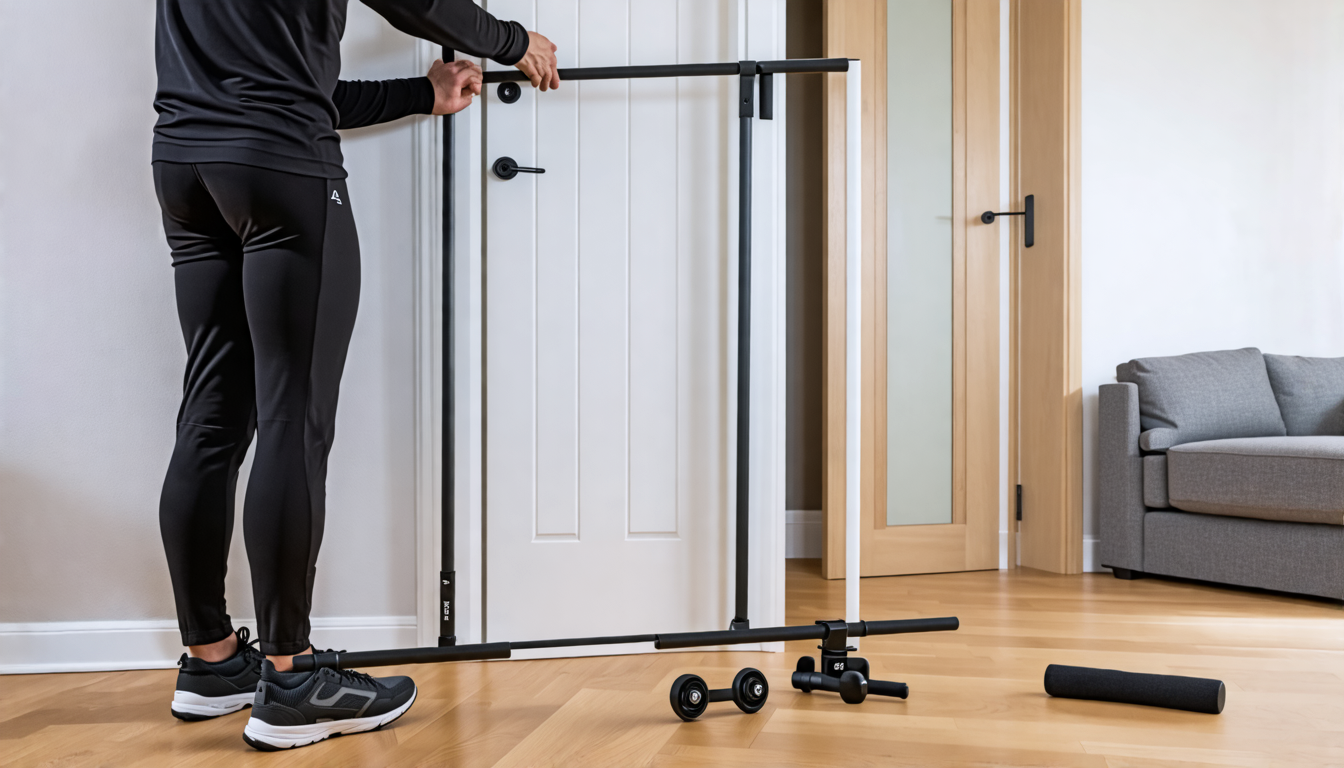
1. **Measure Your Space:**
Measure the width of the doorway or the space where you plan to install the bar. Ensure that the fitness bar you chose can be adjusted to fit this measurement. Most tension-mounted bars are adjustable but check the product specifications to be sure.
2. **Adjust the Bar:**
Extend the bar to match the width of your doorway or chosen space. Some bars come with a spring mechanism or a twist-and-lock function to secure them at the right length.
3. **Position the Bar:**
Place the bar at the desired height. For pull-ups, ensure it is high enough for you to fully hang without your feet touching the ground.
4. **Tighten the Mechanism:**
Use the locking mechanism or twist the ends of the bar to create tension. Make sure it is tight enough so it won’t slip when you put weight on it. Most bars have a specific way to indicate when they are secure, like a click sound or a marker.
5. **Test the Bar:**
Carefully put some weight on the bar by pulling or pushing down gently to make sure it is secure and doesn’t move. Once confident, try hanging on it to ensure full stability.
#### Suction-Mounted Fitness Bars
Suction-mounted fitness bars are less common but can be very useful, especially on smooth and non-porous surfaces such as tiles. Here’s how to install them:
1. **Clean the Surface:**
Before installation, thoroughly clean the surface where you plan to mount the bar. Dirt and dust can reduce the effectiveness of the suction cups.
2. **Wet the Suction Cups:**
For stronger suction, wet the suction cups slightly. This helps in creating a stronger seal against the surface.
3. **Position the Bar:**
Place the bar against the surface and press the suction cups firmly. Most suction bars come with levers that need to be flipped to create a vacuum seal. Make sure to activate these levers.
4. **Check the Seal:**
Ensure that the suction cups have created a tight seal by gently tugging on the bar. If there is any movement, reposition and try again.
5. **Safety Test:**
Apply weight gradually to test the stability of the bar. Always test thoroughly before performing any exercises.
#### Tips for Ensuring Safety and Stability
Regardless of the type of no-drill fitness bar you choose, safety and stability are paramount. Here are some tips to ensure you can work out with confidence:
– **Check Weight Limits:**
Make sure the fitness bar you choose can support your body weight plus the added force from your exercise routine. Most products list their weight limits prominently, so adhere to these guidelines strictly.
– **Inspect Regularly:**
Before each workout session, inspect the bar for any signs of wear or instability. Tighten or reseal as necessary.
– **Avoid Moist Conditions:**
Moisture can weaken the suction or tension grip of no-drill bars, so avoid installing them in overly humid places like bathrooms unless specifically designed for such environments.
– **Utilize Additional Supports:**
For extra safety, consider using additional supports such as safety grips or anti-slip mats, especially in rental apartments where damaging the property should be avoided.
– **Follow Manufacturer Guidelines:**
Always follow the installation guidelines provided by the manufacturer. They are tailored specifically for the product you are using and ensure optimal performance and safety.
By following these steps and tips, you can confidently install a no-drill fitness bar in your home, preserving the integrity of your walls while enjoying the benefits of a versatile exercise tool. Whether in a rental apartment or a fully equipped home gym, these bars offer a flexible and damage-free solution for your fitness needs.
In conclusion, installing a fitness bar without drilling is not only feasible but also offers numerous advantages for home fitness enthusiasts. No-drill fitness bars, available in various types such as tension-mounted and suction-mounted, provide a versatile solution that caters to different needs and preferences. These fitness bars are particularly beneficial due to their ease of installation, which does not require specialized tools or skills, and their ability to preserve wall integrity, making them ideal for renters and those who prefer temporary setups. The portability of no-drill fitness bars also means that they can be relocated effortlessly, whether within different rooms of a house or when moving to a new residence.
The installation process for no-drill fitness bars is straightforward when following a step-by-step guide. Proper alignment, securing the bar according to specific manufacturer instructions, and regular safety checks are crucial to ensure the stability and safety of the bar. Whether being used in a rental apartment or a dedicated home gym, these tips help mitigate any risks associated with using no-drill fitness bars. Given their ease of use and protective features, no-drill fitness bars are a superb addition to any home fitness setup, providing an effective means to enhance upper body strength and overall fitness without the need for permanent modifications to living spaces.