Can I Install a Fitness Bar Without Drilling? The Ultimate Guide to a Damage-Free Home Gym
Imagine this: You finish work, and in the time it takes to change your clothes, you’ve transformed your doorway into a fully functional pull-up station. No holes in the wall, no landlord approvals, just pure, immediate access to strength training. This is the liberating reality of mastering the drill-free fitness bar. It’s the key to unlocking a versatile, commitment-free home gym that respects your space and adapts to your life. This guide is your blueprint for doing it right—securely, effectively, and intelligently.
Foundational Choices: Selecting Your Drill-Free Hardware
Your success hinges on the first decision: choosing the right type of bar. This isn’t just about preference; it’s about matching engineering to your environment.
The Three Pillars of Drill-Free Installation
Each system uses a distinct principle of physics to secure itself. Your living situation and fitness goals will dictate the champion.
| Type | Core Mechanism | Ideal For | Critical Considerations |
|---|---|---|---|
| Tension-Based Doorway Bars | Spring-loaded or screw-tension rods that brace horizontally against a door frame’s inner walls. | Renters, small spaces, quick setup/teardown. Focus on vertical pulls (pull-ups, knee raises). |
|
| Free-Standing Power Towers | A wide, weighted base provides counterbalance and stability, independent of walls. | Multi-purpose training (pull-ups, dips, push-ups), permanent-feel setups without permanence, carpeted floors. |
|
| Wall-Mounted Pressure Bars | Uses a lever arm and padded feet that press upward and outward against wall studs, distributing force. | Apartment dwellers who can’t use doorframes but have robust, stud-backed walls. A semi-permanent feel. |
|
The Non-Negotiable Safety Checklist
Before you purchase, conduct this audit:
- Weight Capacity: The bar’s rated capacity must exceed your body weight + any intended additional weight (e.g., a dip belt). Add a 20-30% safety margin.
- Frame & Wall Assessment: For tension bars, tap your doorframe. A solid “thud” indicates wood; a hollow sound is a deal-breaker. For pressure bars, use a stud finder.
- Clearance: Ensure you have 2-3 feet of clear space in front and behind the bar for full range of motion and safe dismounts.
The Core System: Installation and Dynamic Safety Management
A drill-free bar is a system of managed forces. Your setup protocol is the control panel that keeps those forces in check.
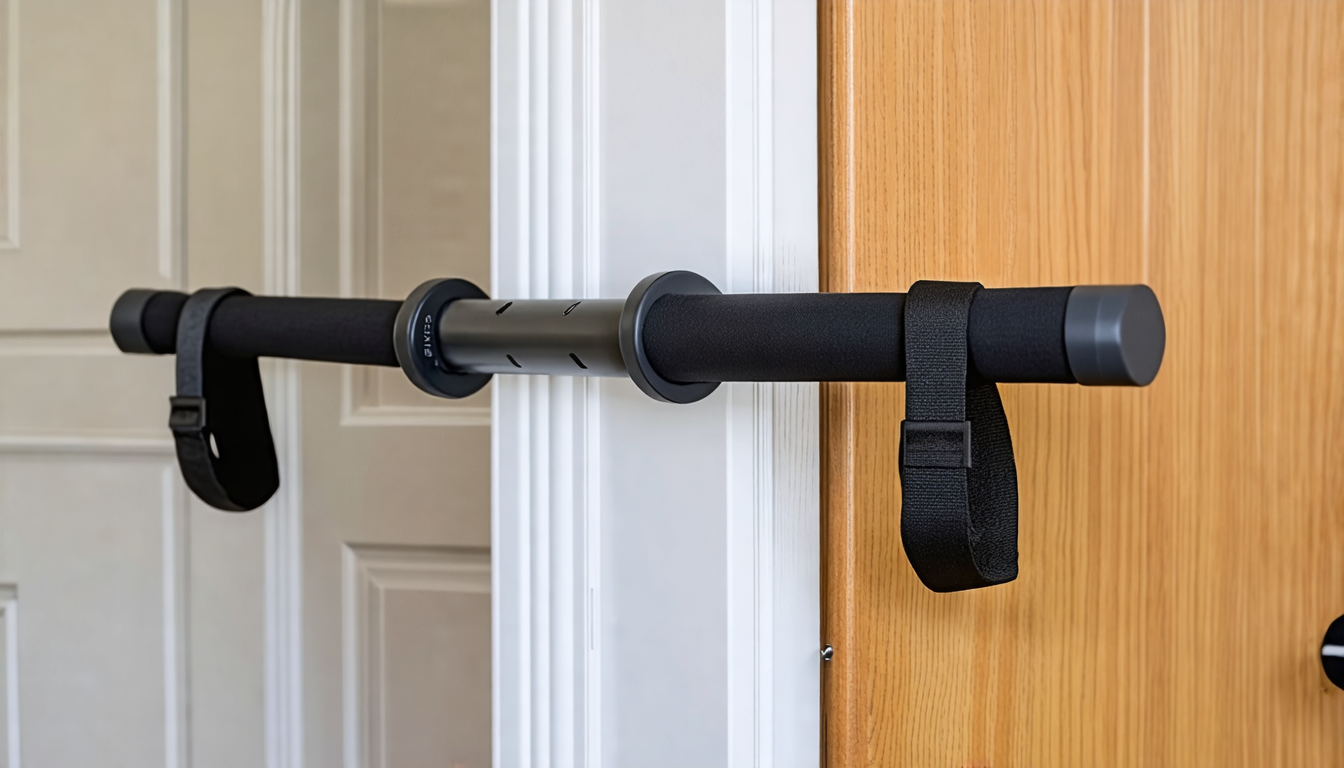
Mastering the Tension Bar Setup
Precision here is everything. Follow this sequence:
- Clean the Contact Points: Wipe the top of the doorframe and the bar’s rubber grips with a dry cloth to remove dust.
- Extend the Bar: Position the bar and extend the tension rods until they are slightly wider than the doorway.
- Angled Entry: Tilt one end up, hooking its grip over the frame. Then, carefully lower the other end into place.
- Final Tension: For screw-tension models, turn the knobs until they are hand-tight, then give a final quarter-turn with firm pressure. Do not use tools to overtighten.
The Critical Checks: Use a level to ensure the bar is perfectly horizontal. Visually confirm the rubber grips are flush and compressed against the frame. Perform the “Pull Test” before every use: hang from the bar with your full weight for 10 seconds, checking for any slippage, creaking, or movement.
Stabilizing Your Free-Standing Station
Stability is a function of base management. On hard floors, use anti-vibration mats under the feet to prevent “walking.” On carpet, a rigid plywood base under the unit distributes weight more evenly. For intense training, add sandbags or weight plates to the dedicated pegs on the base. Always ensure all locking pins are fully engaged and the structure is on level ground.
Advanced Practices: Optimizing Your Training Ecosystem
With your secure foundation, shift focus from installation to maximization.
Exercise Selection & Intelligent Adaptation
| Equipment | Primary Exercises (Safe & Optimal) | Advanced Augmentations |
|---|---|---|
| Tension Bar | Strict pull-ups/chin-ups, hanging knee raises, isometric holds. | Use resistance bands for assisted reps or to add leg resistance for raises. Avoid: kipping, explosive muscle-ups, or weighted pulls exceeding 25% of your body weight. |
| Free-Standing Tower | Pull-ups, parallel bar dips, knee raises, push-ups (on handles). | Secure a suspension trainer to the pull-up bar for rows and face pulls. Add a weighted vest or dip belt for progressive overload, staying within the machine’s rated capacity. |
Creating a Seamless, Stowable Gym
The true power of a drill-free system is its invisibility. For tension bars, keep a small hook nearby to hang the bar when not in use. Free-standing towers often have a smaller footprint than you think; position them in a room’s corner to define your gym zone without dominating it. This modular approach means your office or living room can revert to its primary function in seconds.
Threat Management: The Proactive Protocol
Mastery is defined by preventing problems, not reacting to them.
The Pillars of Prevention
- The Pre-Workout Ritual: A 30-second inspection. Check tension, look for frame cracks, ensure all connections are tight.
- Protective Padding: For tension bars, consider removable foam pads or a towel between the bar’s grips and your doorframe to prevent scuff marks.
- Respect the Limits: Drill-free systems excel at controlled, bodyweight strength training. They are not designed for the dynamic, high-impact forces of CrossFit-style kipping or heavy, ballistic weighted movements.
Troubleshooting Common Issues
| Problem | Likely Cause | Immediate Solution |
|---|---|---|
| Bar slowly slips down the doorframe. | Loss of tension from grip wear, dusty surfaces, or frame compression. | Disassemble, clean all contact points, and re-tension. If persistent, the frame material may be unsuitable. |
| Free-standing unit rocks during dips. | Uneven floor or insufficient weight on the base. | Place shims under the offending foot to level it. Add sandbags to the base’s weight pegs. |
| Doorframe molding prevents a secure fit. | The bar’s grip pads are contacting angled molding, not the flat vertical frame. | This is a compatibility issue. Abandon the tension bar for this doorway; switch to a free-standing model. |
Your Drill-Free Installation Roadmap
| Phase | Primary Tasks | Focus Mindset |
|---|---|---|
| Assessment | Measure doorways, clear floor space, calculate total user + potential weight. | Brutal honesty about your space’s physical constraints. |
| Selection | Choose hardware based on your audit. Prioritize safety specs over flashy features. | Matching the tool to the job, not the other way around. |
| Setup | Follow the manual meticulously. Conduct the Pull Test. Involve a spotter for first use. | Precision and patience. There is no rushing this step. |
| Integration | Establish the inspection ritual. Add protective padding. Plan your first week of workouts. | Building sustainable, safe habits from day one. |
Effective fitness doesn’t require permanent alteration of your home, but it does demand a permanent commitment to intelligent practice. You’ve moved from seeing barriers—like rental agreements or limited space—to understanding the elegant solutions that overcome them. By choosing the right hardware, mastering its secure setup, and adopting a vigilant training protocol, you’ve answered the question with authority: yes, you can install a powerful fitness bar without drilling a single hole. You’ve gained more than a piece of equipment; you’ve claimed the freedom to build strength on your own terms, anytime, with unwavering confidence and peace of mind. Your home gym is ready. The first pull-up awaits.


